Difference between revisions of "Instruction Manual"
| (19 intermediate revisions by the same user not shown) | |||
| Line 1: | Line 1: | ||
== Balthazar Instruction Manual == | == Balthazar Instruction Manual == | ||
| − | In | + | In the video below, it is illustrated how Balthazar modules and components are connected and how it all fits into the case. |
| + | |||
| + | '''Description:''' | ||
| + | |||
| + | Main modules – [[Power Supply|PSU]], [[I/O USB|I/O board]], [[Keyboard|the keyboard]] and [[Unifying-PCB|Unifying board]] are connected via a flat and short USB cable Type A or a combined, while the flat 2-wire cable connects to a speaker. | ||
| + | |||
| + | 3-wire flat cables are used to connect to the battery pack. | ||
| + | |||
| + | Camera goes into the unifying board via USB or a flat cable. | ||
| + | |||
| + | The touchpad and small screen are connected to a I2C that is on the keyboard PCB. | ||
| + | |||
| + | The screen is connected to a Unifying Board that also has a video output. | ||
| + | |||
| + | All the elements are placed into the casing and screwed to a chassis (in development). | ||
| + | |||
| + | Upper covers of the keyboard are fitted. | ||
| + | |||
| + | {{#evt: | ||
| + | service=youtube | ||
| + | |id=https://youtu.be/GN7CpjQyBcs | ||
| + | |alignment=center | ||
| + | }} | ||
| + | |||
| + | |||
| + | Internal connections are also available for camera adoptions, as it is shown on the video below. | ||
{{#evt: | {{#evt: | ||
service=youtube | service=youtube | ||
| − | |id=https://youtu.be/ | + | |id=https://youtu.be/Nm6NnHadsa0 |
|alignment=center | |alignment=center | ||
}} | }} | ||
| + | |||
| + | |||
| + | '''GPIO''' cable we implement is ribbon cable with IDC connectors; 40x28AWG; Cable ph: 1.27mm. | ||
| + | |||
| + | <gallery> | ||
| + | File:Gpio cable.png | ||
| + | </gallery> | ||
| + | |||
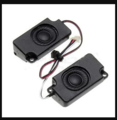
| + | Speakers 8 ohm, 2W, with connector to our Power Supply Unit PCB | ||
| + | |||
| + | <gallery> | ||
| + | File:Speakers1.png | ||
| + | </gallery> | ||
| + | |||
| + | Space for batteries is reserved under the keyboard. At the moment Power Supply has been tested | ||
| + | with Samsung battery with 4800 mAh and more specs are on our [[Specifications]] page. | ||
| + | |||
| + | <gallery> | ||
| + | File:Batt.5V out.png | ||
| + | File:8.png | ||
| + | </gallery> | ||
Latest revision as of 10:53, 31 October 2022
Balthazar Instruction Manual
In the video below, it is illustrated how Balthazar modules and components are connected and how it all fits into the case.
Description:
Main modules – PSU, I/O board, the keyboard and Unifying board are connected via a flat and short USB cable Type A or a combined, while the flat 2-wire cable connects to a speaker.
3-wire flat cables are used to connect to the battery pack.
Camera goes into the unifying board via USB or a flat cable.
The touchpad and small screen are connected to a I2C that is on the keyboard PCB.
The screen is connected to a Unifying Board that also has a video output.
All the elements are placed into the casing and screwed to a chassis (in development).
Upper covers of the keyboard are fitted.
Internal connections are also available for camera adoptions, as it is shown on the video below.
GPIO cable we implement is ribbon cable with IDC connectors; 40x28AWG; Cable ph: 1.27mm.
Speakers 8 ohm, 2W, with connector to our Power Supply Unit PCB
Space for batteries is reserved under the keyboard. At the moment Power Supply has been tested with Samsung battery with 4800 mAh and more specs are on our Specifications page.
- 8.png


